Device Links
Have you ever wanted to take a trip down memory lane and see when your friendship with a friend began on Facebook? Or maybe you’re curious about the last time you changed your relationship status or want to see your entire relationship history. Checking your friendship and relationship history on Facebook is quite simple.
In this article, we’ll show you how to see your friendship and relationship history on Facebook, both on the web and through the mobile app. And this method will work even if you have made your Facebook profile private.
How to See Your Friendship History on Facebook On the Web
It’s easy to view your Facebook friendship history from the web. However, there’s no one-click option to check the history with all your friends at once. You’ll need to go to each friend’s profile and check the history of when you became friends individually. Follow these instructions to do it:
- On your desktop, open Facebook in a web browser and log in with your credentials.
- In the search bar, type the name of the friend you want to see how long you’ve been friends with on Facebook. Then, hit the Enter key.
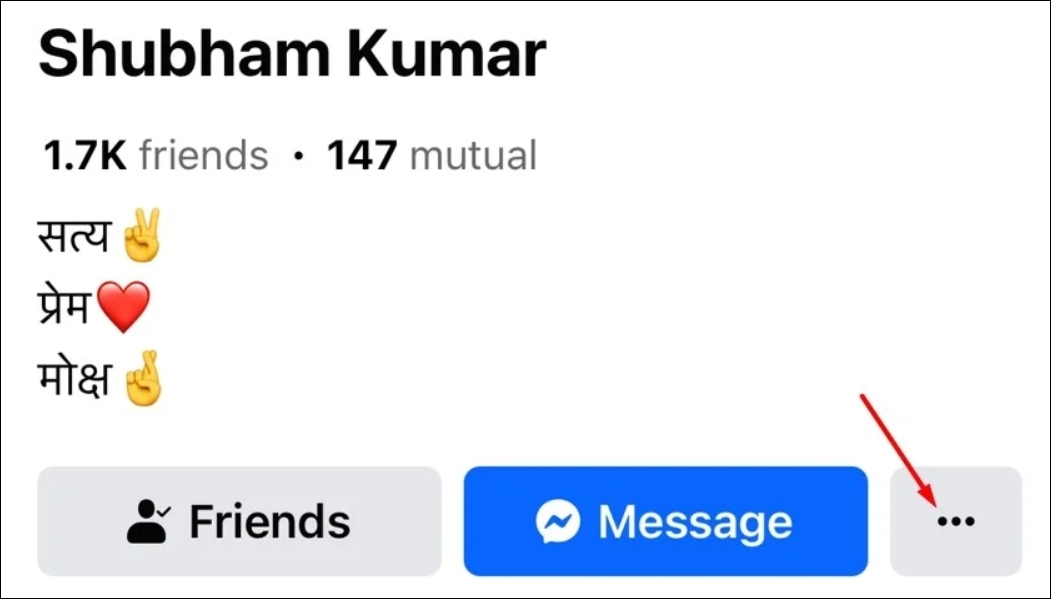
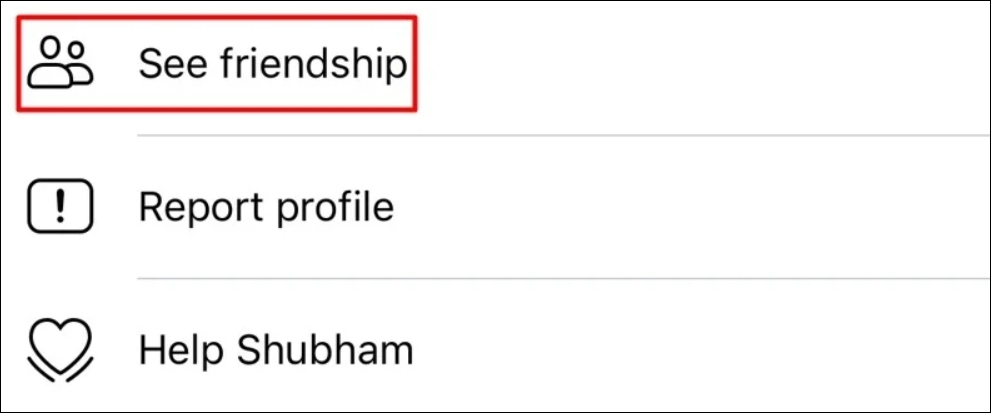
- On your friend’s profile page, click the three horizontal dots (….) and choose the See friendship option.

- Under the Things in Common section, you’ll see the month and year you became friends on Facebook.

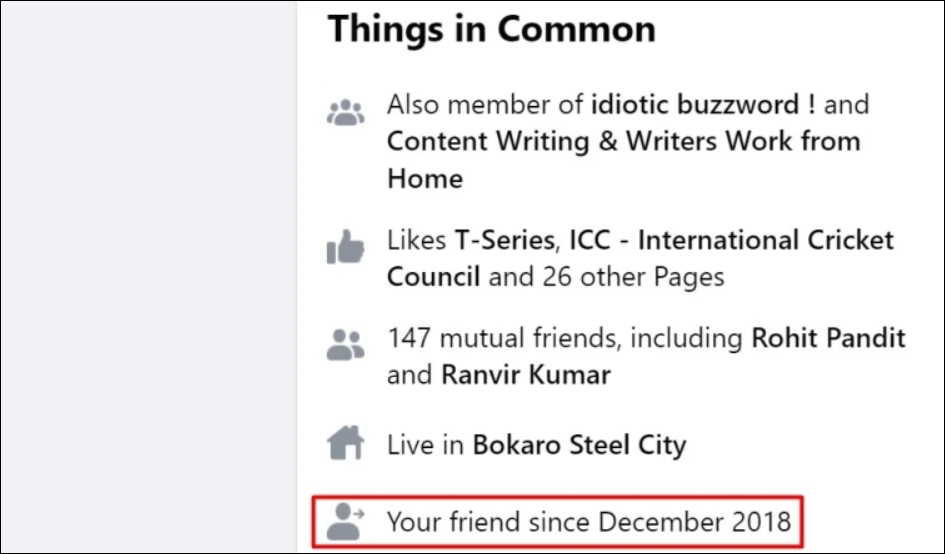
You’ll also see other information under this section, including mutual friends, pages you both have liked and groups you are both part of.
How to See Your Friendship History on Facebook on Android or iPhone
Just like on the web, you can easily check your Facebook friendship history on your Android or iPhone. Here’s how:
- Open the Facebook app and tap the search icon in the upper right corner.
- In the search field, type the name of the friend you want to check your history with.
- Tap the three dots next to the Message option.
- Select See Friendship.
- On the next page, you’ll find the month and year you became friends with your chosen friend on Facebook.

How to See Your Relationship History on Facebook on the Web
Facebook lets you easily see your relationship history, including your relationship statuses and the date you changed them. To see your relationship history on Facebook from your desktop computer, follow these steps:
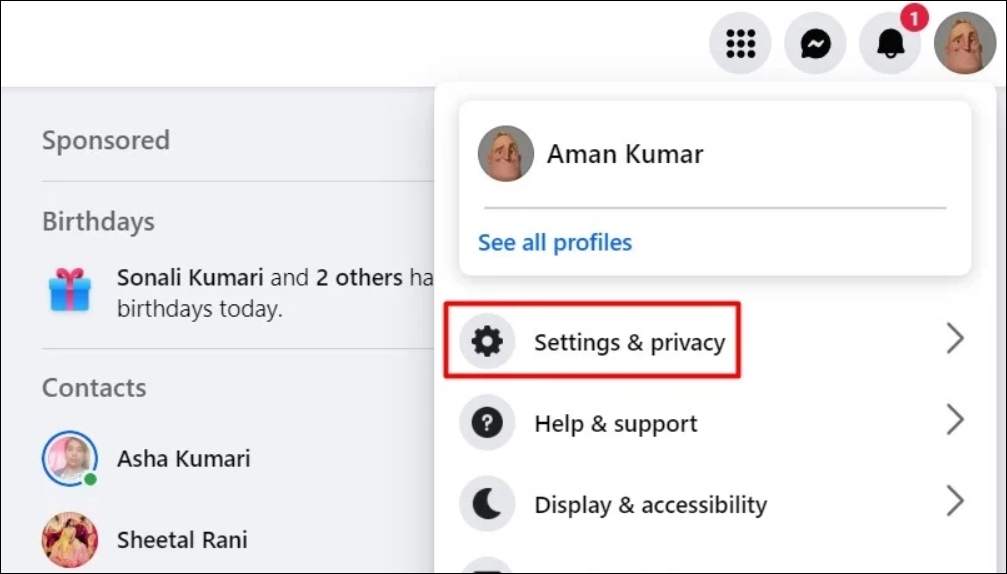
- Open Facebook in a web browser and click your profile icon in the top-right corner.
- Choose Settings & privacy from the drop-down menu.
- Click Settings.
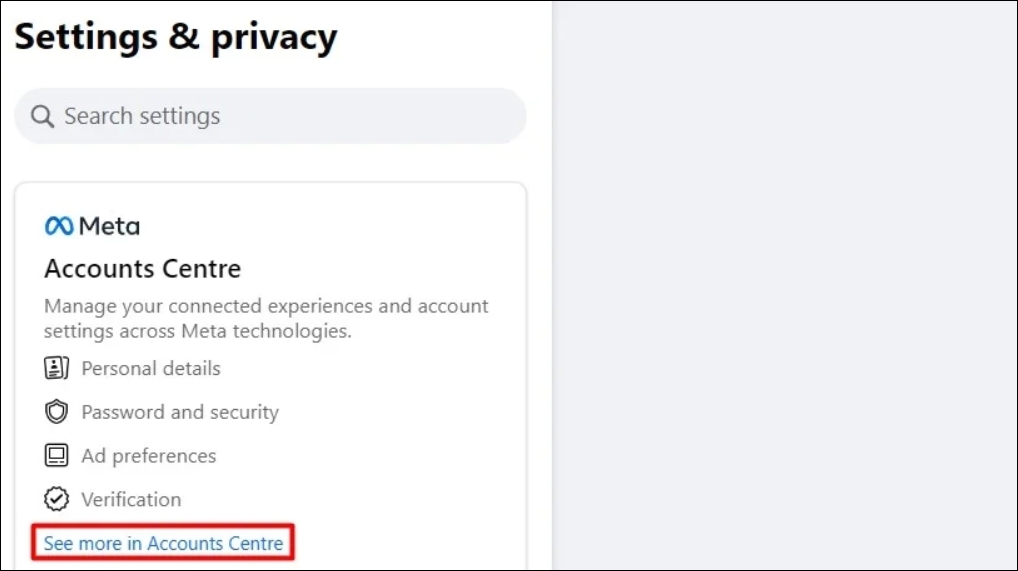
- Click See more in Accounts Center in the left-hand pane.
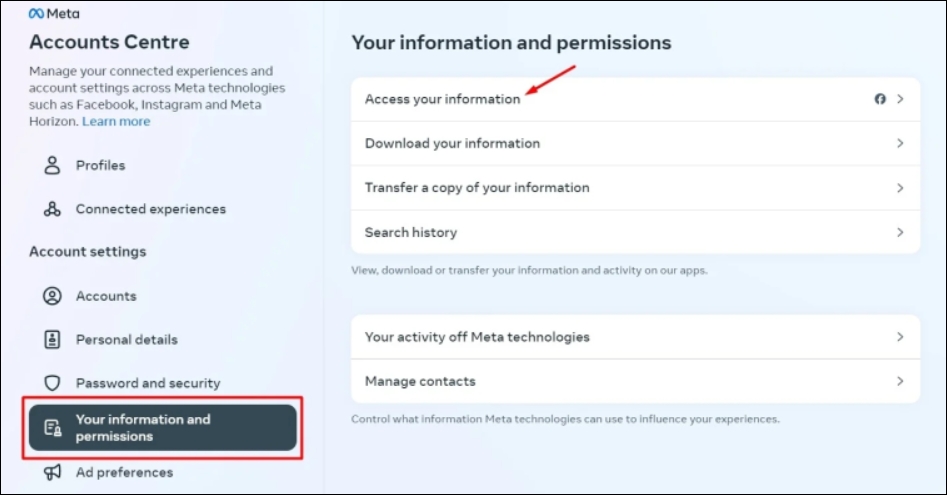
- Choose Your information and permissions from the left-hand pane and click Access your information on the right.
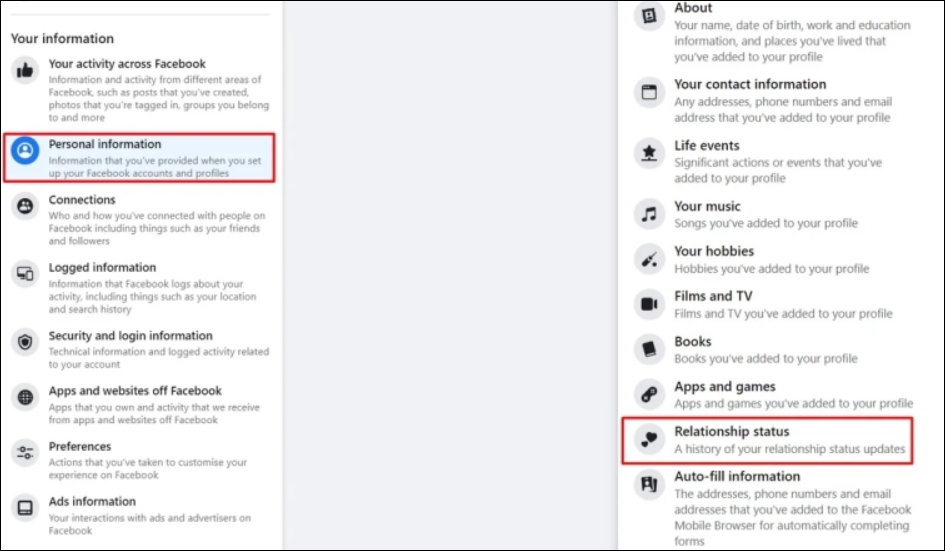
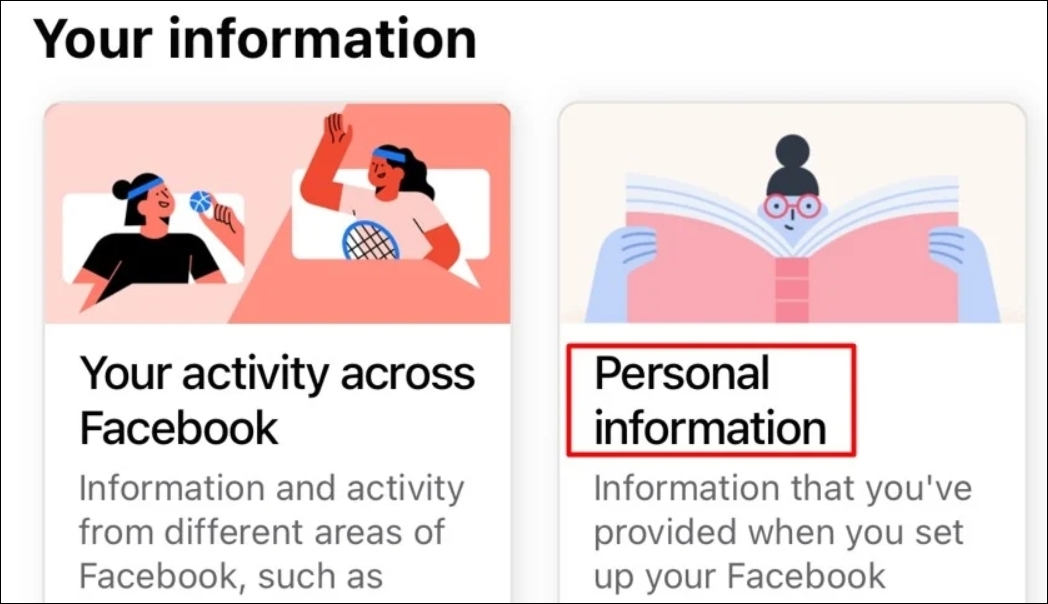
- Select Personal information from the left-hand pane, and then click Relationship status in the right pane.
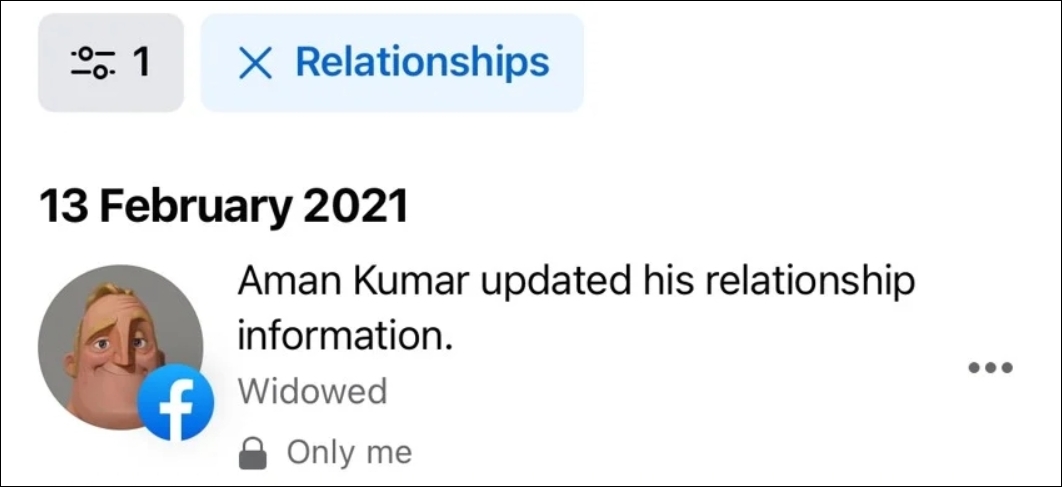
- You’ll see your relationship history under the Relationships section.

How to See Your Relationship History on Facebook on Android or iPhone
You can also view your relationship history on Facebook from your Android or iPhone. The steps are almost identical for both devices, except for where you’ll find the menu icon.
On Android, you’ll find the menu icon in the top-right corner. On iPhones, it’s located in the bottom-right corner. With that in mind, here’s how to check your Facebook relationship history on your Android or iPhone
- Open the Facebook app on your mobile and tap the menu icon.
- Tap the drop-down icon next to Settings & Privacy and choose Settings from the menu that appears.
- Select See more in Accounts Center.
- Choose Your information and permissions.
- Tap on Access your information.
- Choose the Personal information tile.
- Under the Profile information section, tap the See more button.
- Select Relationship status.
- You’ll see all the changes you made to your account regarding your relationship.


How to Delete a Relationship History on Facebook
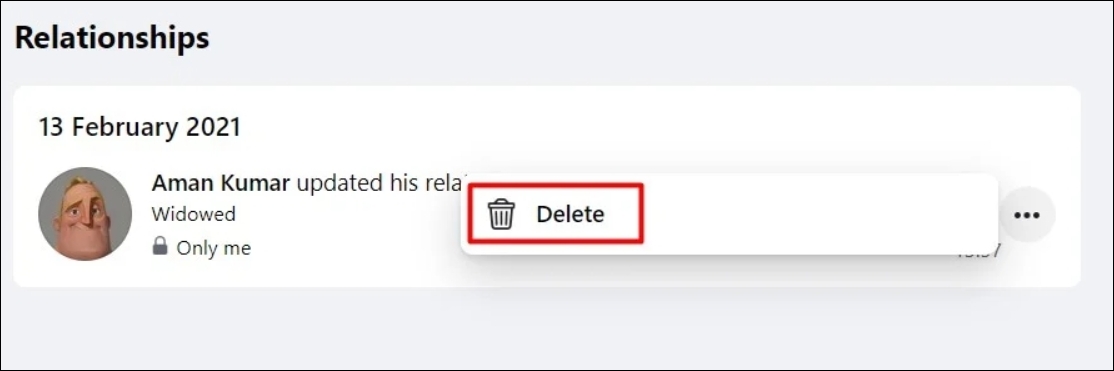
At some point, you might need to remove a past relationship from your Facebook history. Luckily, it’s as simple as deleting a regular Facebook story.
To remove a past relationship from your Facebook history on your desktop, navigate to the Relationship status section from Meta’s account center. Then, click the three dots next to the relationship you want to remove and choose Delete.
You can follow similar steps to remove a relationship history on Facebook from an Android or iPhone. Note that deleting a relationship history won’t show up in your Facebook feed.
Track Your Relationships and Friendships on Facebook
That’s how you can see your friendship and relationship history on Facebook. Once you have this information, you can find other interesting data about your Facebook account, like when you created your account or videos you’ve recently watched.
FAQs
How do I see relationship status on Facebook?
Checking someone’s relationship status on Facebook is super easy. On your desktop, open Facebook in a browser and head to the profile of the person whose relationship status you’re curious about. On the left side of the page, under the About section, you’ll find their relationship status listed. To check from the Facebook mobile app, open the app, and visit your friend’s profile. You can see the relationship status of your friend under the Details section.
What happens if you delete someone’s friend request?
Deleting someone’s friend request on Facebook prevents them from sending you another request for one year. If you also block them after deleting the request, they will not be able to send you any requests until you unblock them.
Do deleted friend requests automatically become followers?
The short answer is Yes. Once you’ve sent a friend request to someone, it doesn’t matter whether that person accepts it or not; you start following that person. This means you’ll see whenever that person posts something new, a photograph, comments, and updates its bio, as long as those updates are posted publicly.


Disclaimer: Some pages on this site may include an affiliate link. This does not effect our editorial in any way.